Jetpack Compose is a new UI toolkit for native Android UI development that enables declarative UI. Traditional Android UI development is done either using a markup language to create and style native components, or with imperative Kotlin statements. With its declarative Domain-Specific Language (DSL) Jetpack Compose allows efficient development of UI with compact, easy-to-read statements.
One exciting capability of this new toolkit is the ability to more closely couple the UI with the business logic. With a traditional Android app, the entire presentation layer is deployed as part of the application. If the appearance of the app needs to change, a new version of the app must be deployed. We often struggle with the desire to build apps in such a way that we can make changes on the server and have them immediately reflected on the user’s device.
In the past, the most efficient way to achieve this has been to embed web pages within the app, but this requires a number of sacrifices. Because the web page rendering is mediated through a WebView, integrating the web and native pages can be a struggle. By developing with Compose, we can build components into our native UI that are a direct reflection of the endpoint results. This gives us much greater control over the appearance and behavior of our app without redeploying.
There are a great number of strategies for this, depending on the amount of control we hope to exercise remotely. Here, we present an example of a technique that directly renders API results in native screens. The focus here is on presenting the far end of the spectrum, where the server totally drives the UI, including building in server callbacks to submit form selections. The complete sample is available on GitHub.
A Simple Form
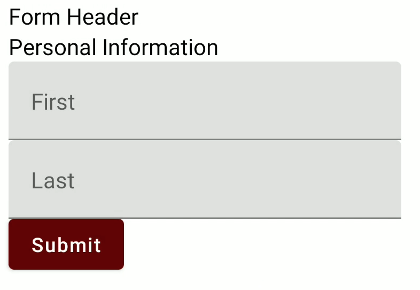
All of the UI in this form, displayed in an Android app, was generated from this JSON:
{
     "children" : [
         {
             "viewtype" : "TEXT",
             "label" : "Form Header"
         },
         {
             "viewtype" : "FORM",
             "children" : [
                 {
                     "viewtype" : "TEXT",
                     "label" : "Personal Information"
                 },
                 {
                     "viewtype" : "TEXTFIELD",
                     "label" : "First",
                     "data" : "first_name"
                 }, {
                     "viewtype" : "TEXTFIELD",
                     "label": "Last",
                     "data" : "last_name"
                 }
             ],
             "label" : "Submit",
             "data" : "/check"
         }
     ]
 }
To make it easier to follow, the objects are labeled with the type of view that they will produce. The screen root is a Column view that presents its list of children, each of which is converted into a @Composable. For instance, this is the code that generates the First Name text input:
class TextFieldElement(val elementDto: ElementDto) : ComposableElement {
     val fieldName = elementDto.data?:"value"
     @Composable
     override fun compose(hoist: Map<String, MutableState<String>>) {
         TextField(value = hoist.get(fieldName)?.value?:"", onValueChange = {hoist.get(fieldName)?.value = it}, label = { Text (elementDto.label?:"") })
     }

     override fun getHoist(): Map<String, MutableState<String>> {
         return mapOf(Pair(fieldName, mutableStateOf(elementDto.default?:"")))
     }
 }
When we parse the JSON, we transform each element from a Data Transfer Object (DTO) to an object that can return a @Composable. When the element accepts input, it also generates the hoists necessary to access and act on that data at a higher level in the view hierarchy. Here, our submit button is able to retrieve the text from the text input fields, and pass it on to our server. (In this case, the server is actually a fake built into the app for ease of portability.)
Building the Application
Our MainActivity is extremely small, because all it does is ask the server for the screen we will render. All the activity onCreate does is instantiate our base @Composable with the app theme:
setContent {
     MyApplicationTheme {
         MyScreenContent()
     }
 }
Our @Composable has an external holder for the server JSON result that it provides as an Ambient to allow screen elements to trigger loading a new screen:
data class StringHolder(var held: MutableState<String>)
 val ScreenJson = ambientOf<StringHolder>()
And here is our main @Composable that does the work of loading the screen from JSON. We use Moshi here instead of kotlinx serialization because kotlinx serialization is currently incompatible with Jetpack Compose. A workaround exists that will work for many situations, by separating the DTOs into a different module, but because we are converting our DTOs directly into @Composable, this will not work for us.
@Composable
 fun MyScreenContent() {
     // Load initial API endpoint
     val screenJson = ServiceLocator.resolve(BackEndService::class.java).getPage("/", mapOf())
     // Create the holder that can be updated by other @Composables
     val screenJsonString = StringHolder(remember {mutableStateOf(screenJson)})
     val screenAdapter: JsonAdapter<ScreenDto> = ServiceLocator.resolve(JsonAdapter::class.java) as JsonAdapter<ScreenDto>
     Providers(ScreenJson provides screenJsonString) {
         val holder = ScreenJson.current
         screenAdapter
             .fromJson(holder.held.value)?.let {
                 Screen(it).compose()
             }
     }
 }
The FORM element in the JSON is the most customized element. It expects a data field which is the URL to which the form submissions will be passed. Each element that hoists data is responsible for identifying the key that it will be passed as, and these are sent along as a map.
Button(onClick = {
     val parameters = children.flatMap { it.second.entries.map { Pair(it.key, it.value.value)  } }.toMap()
     val newPage = ServiceLocator.resolve(BackEndService::class.java).getPage(elementDto.data?:"", parameters)
     json.held.value = newPage
 }){
     Text(elementDto.label?:"")
 }
Another Form
When the JSON text holder is updated at the Button level, it triggers a new compose phase at the top level, in MyScreenContent. The JSON is read:
{
     "children" : [
         {
             "viewtype" : "TEXT",
             "label" : "Form Header"
         },
         {
             "viewtype" : "FORM",
             "children" : [
                 {
                     "viewtype" : "TEXT",
                     "label" : "Checkboxes"
                 },
                 {
                     "viewtype" : "CHECKBOX",
                     "label" : "First",
                     "data" : "first_check"
                 }, {
                     "viewtype" : "CHECKBOX",
                     "label": "Last",
                     "data" : "last_check"
                 }
             ],
             "label" : "Submit",
             "data" : "/welcome"
         }
     ]
 }
And we display a new screen:

Moving On
Obviously, there is a lot of work to do to make this look polished. We can choose to do that work on the app side, by applying consistent styling to our building blocks and allowing the backend to compose them. We can also defer those decisions to the backend by allowing the backend to specify Modifier attributes that we will apply to each element.
This is just a small glimpse into a totally different style of app development. It will not be a great match for every project, but for projects with a high degree of control over the backend, and constantly evolving business logic, it can allow the Android app to seem as responsive as a webpage.