
Flutter has become one of the most popular cross-platform development frameworks. It allows you to build apps for iOS, Android, web, and now desktop from a single codebase. You can use Flutter to build apps for MacOS to provide a desktop experience for your users.
If you have a mature mobile Flutter app, but did not consider desktop originally, it can be a challenge to add this support. But with a few updates and abstractions, you can have a functional desktop build setup for incremental improvement until it reaches feature parity with your deployed mobile platforms.
Why add MacOS support to a Mobile Flutter app?
There are a few reasons to consider desktop support for your mobile app:
- To reach a wider audience — those that would not use your mobile app
- To engage your existing users more broadly — in more places and on more devices
- To enable new user scenarios — features not typical on mobile platforms, like multiple monitor, and large peripheral support

But there are some other indirect benefits as well:
- To debug responsiveness — desktop UI debugging is easier than on Flutter web
- To drive better design decisions and abstractions — supporting and testing multiple platforms results in better separation of concerns and dependency injection
Adding MacOS Support
Adding Mac support is automatic for new Flutter apps, so this article focuses on challenges that come with adding support to a mature mobile Flutter app that does not yet support desktop. For instructions to setup your development environment for Apple platform development, head over to this great documentation on the Flutter Dev site.
Let’s go ahead and add MacOS support to an existing project. Run flutter create in your existing project directory, specifying the same ‘name’ you have listed at the top of your pubspec file
flutter create –platforms=macos –project-name=<pubspec name>
Now you could try to build to see what happens…
flutter build macos –-debug
But you’ll probably see lots of warnings and finally several build failures due to your pod libraries. Maybe something like this…
warning: The macOS deployment target ‘MACOSX_DEPLOYMENT_TARGET’ is set
to 10.6, but the range of supported deployment target versions is
10.13 to 13.1.99.
What happened?
You have pods getting pulled in due to mobile support packages you are using and the default min MacOS version from flutter create is probably lower than what your pods support.
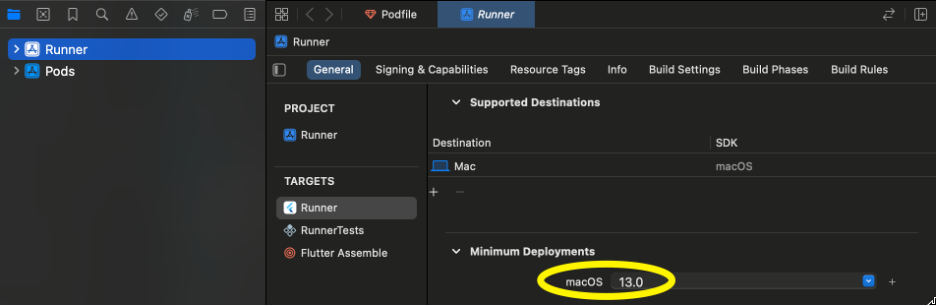
Make the changes below to target a more recent version of MacOS (say >=13.0) and try again.
Update the minimum version in your MacOS project workspace.
Also, update your MacOS Podfile. You may have similar lines in your iOS Podfile. Only the first line is necessary, but the post install section will remove warnings.
platform :osx, ‘13.0’
…
post_install do |installer|
installer.pods_project.targets.each do |target|
flutter_additional_macos_build_settings(target)
target.build_configurations.each do |config|
config.build_settings[‘MACOSX_DEPLOYMENT_TARGET’] = ‘13.0’
end
end
end
Now, delete your Podfile.lock and Pods directory, and try again.
Once, you have a successful build, you may need to resolve runtime errors. Runtime failures can occur due to dependencies on packages that either do not support desktop or need to be specifically configured for a new platform.
Here are some examples. (Some of these issues may have been addressed since the time of writing.)
Analytics
We ran into issues with unsupported analytics packages like Firebase, MixPanel, and Amplitude.
The first step was to disable analytics. We wrap our analytics with a standard interface that supports multiple providers, so it is straightforward to leave out a provider.
For a real product, we might use REST APIs to add analytics support. Both MixPanel and Amplitude support this. Firebase supports MacOS so it just needs an additional configuration passed to the initialization.
Dio
Many existing projects may be using Dio as part of their networking stack. If you have added your own httpClientAdapter (perhaps for Charles proxy support), this may need to be modified as the underlying default adapter is of a different type on desktop than on mobile.
Permissions
The permissions_handler package does not support MacOS, so we needed to wrap that with another class.
One abstraction approach is presented here:
class PlatformPermissions {
static Future<PermissionStatus> status(Permission type) async {
if (Platform.isMacOS) {
return PermissionStatus.restricted;
} else {
return type.status;
}
}
static Future<PermissionStatus> request(
Permission type,
) async {
if (Platform.isMacOS) {
return PermissionStatus.restricted;
} else {
return type.request();
}
}
static Future<bool> openSettings() async {
if (Platform.isMacOS) return false;
return openAppSettings();
}
}
Remember, the initial goal here is to get your app running on MacOS with a stubbed out feature set if necessary. Then you can incrementally add MacOS appropriate solutions for these.
Web Views
You may need to switch to a beta version of a package. For example, at the time of this writing flutter_inappwebview only supported MacOS in 6.0.0-beta (now in release). Such a major release upgrade to a dependency may require additional changes to mobile code due to deprecations or interface changes.
If your authentication flow depends on ChromeSafariBrowser, you can add a Platform specific path for MacOS that uses a derived InAppBrowser. Since this opens an external browser window on MacOS, it is a fairly straightforward drop in replacement. Your remaining auth logic should work fine.
The webview_flutter package does not support MacOS, so you can switch to flutter_inappwebview or support both. We had a specific scenario in mind for webview_flutter on mobile we did not want to change, so we implemented a PlatformWebView that would use an appropriate web view based on platform.
For example:
Widget _platformWebView() {
if (Platform.isMacOS) {
desktop_webview.InAppBrowser().openUrlRequest(
urlRequest: desktop_webview.URLRequest(
url: desktop_webview.WebUri(initialUrl)
),
);
return const Center(child: Text(‘Opened in external browser…’));
} else {
return WebView(
gestureRecognizers: gestureRecognizers,
javascriptMode: JavascriptMode.unrestricted,
navigationDelegate: onNavigationRequest,
onWebResourceError: onWebResourceError,
initialUrl: initialUrl,
);
}
}
App Icons
Finally, flutter create will not leverage your app icons from mobile to create the desktop app icons, so you will have the default Flutter icon at first. You’ll need to add icon versions for MacOS. These differ in size in some places than the mobile configurations.
Similar solutions or workarounds can be applied to other package failures. Our goal here is not yet feature parity, but a running version of our app on MacOS.
Summary
Adding MacOS support to a mature mobile Flutter app can be a bit of work, but it can be a great way to reach a wider audience and provide users with a more consistent and powerful user experience.
The ease or difficulty you can adapt your code base can highlight areas where you might benefit from a better service abstraction.
Beyond feature parity, you will want to make sure that your app is designed to be used on a desktop platform. This may mean using a different layout and design than you would for a mobile app. You should also consider features that users expect from a desktop app, such as drag-and-drop and right-click menus.
With cross platform solutions like Flutter, navigating the tradeoffs in cost, maintenance, staffing, and operations without compromising user experience, can be a complex journey. Bottle Rocket can guide you on this journey and provide you attractive options to engage your users on any of their primary digital platforms.